Showing posts with label Grey. Show all posts

Monday, April 16, 2012

Splatter Mani

0 comments
After several weeks of growing my nails, I've reluctantly had to cut them. My two thumb nails were torn since a couple of weeks, and my repair attempts with glue polish and fake nails glue couldn't last forever. So I figured I would cut them very short and give them an other chance to grow without breaking this time!

I wanted to do a splatter manicure since a while, and since my nails are too short for a French Mani I figured this would be the right time. Plus, a trashy mani like this makes less noticeable the fact that my thumb nails are all irregular and ugly!

I used Sally Hansen Smooth and Perfect in Fog #01 as my background color. The polishes of this collection are really pretty. They have a kind of "fluffy" or "cloudy" finish that I like a lot. Fog is a subtle grey which looks clean and elegant. the splatters were made with a straw and a toothpick with Sinful Colors Dream on #113 (a neon fushia-purple that I love!!) and Santee Vikini-Green #M60. 
For those of you who would like to purchase Dream on, please note that it is matte, which can be surprising (or at least it was for me at first).

For once I will show you both hands, as each nail is really different.

Here is my left hand:

BeFunky

BeFunky


And my right hand:


BeFunky

BeFunky


I love the variety of effects you can get with this technique, athough the finish I like best is the one I got on my left thumb an index:

BeFunky


Pin It

Neon Orange and Grey + Holo glitters French Manicure

0 comments
My other favorite color of the season, other than green, is orange. I found a really pretty Neon orange during my last shopping session and decided to use it for my next French Manicure.

Here are the polishes I used, under the careful supervision of Charlie, my recently adopted cat:
BeFunky 

Other than my base coat and top coat, I used:
  • Santee Beach Yellow #M57A, a very pretty neon orange (and not yellow!!!). Santee polishes are extremely cheap with a large choice of color, but they're full of toxic components... I guess you can't ask for much with a $2 polish...
  • Confetti Lonsesome Dove #002, a light grey
  • Claire's Disco, a transparent polish with chunky holographic glitters


 I applied one coat of base coat (of course!) and then of the Orange, but I quickly realized that it was super transparent... (eww)

  BeFunky 


 Therefore I applied a couple of coats of White, then 3 coats of Orange (yes, you counted right, that makes a total of 7 coats so far...). Now that's orange! 

BeFunky 


 An then, finally, I applied a coat (maybe 2?) of Grey on the tips using French Manicure stickers and 2 coats of yhe Claire's Holo Glitters polish and Ta-Da! I was super happy of the result! My only problem was that after so many coats, the polish at the base of the nail was super irregular and didn't look as clean as I would have want it to. But well. 

  BeFunky 

BeFunky 

 And with natural sun light: 
BeFunky 

 The tip was so thick that it looked like my nails were fake, lol! You really don't want to know how long it took me to take it off 4 days later... But i any case, I think Charlie liked it!


Pin It

First Watermarble manicure

1 comments
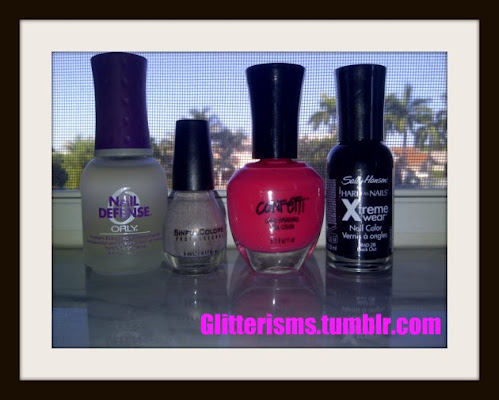
Here are the nail polishes that I used for my very first Water Marble Manicure : 
  • Base and Top Coat : Orly Nail Defense
  • Sinful Colors Twilight #M971
  • Confetti Fruit Smoothie #023
  • Sally Hansen Hard as Nails Xtreme wear Black Out #370
polish
I prepped my nails with one coat of Orly and 2 coats of Twilight. Then, following the instructions posted on various Water Marble Youtube tutorials I started my nail art. Here is the final result!!
It's kind of sloppy... but it's my very first so be gentle ;)


PS : due to some weird bug, this post is not my first Watermarble in the list... please excuse the weirdness :D
Pin It