Showing posts with label Sally Hansen. Show all posts

Thursday, April 19, 2012

Beginners Tutorial - Super cute pink and fushia dotty French Manicure

4 comments
Hi everyone!
Lately my color choices have been all about orange and green, and my best friend complained because she hates these colors :-D
So I decided to get back to the basics and do something cute and that doesn't take too long.

For this mani, you will need
  • a base coat
  • a background color (I used Sally Hansen Xtreme wear Bubblegum Pink #470)
  • a colors for your dots (I used Wet n Wild Fastdry FuchsiaRama #232C)
  • a top coat
  • a dotting tool
If you don't own a dotting tool, I highly recomment you check out The Beauty Department's article about her DIY dotting tool. She uses a pen or pencil, an eraser and a pin. Very smart! Besides, her nail arts are super pretty.

Most polishes work fine for dots. However, some cheap polishes (and I have a lot of those!) are too fluid for dots. Consequently I usually test whatever polish I wanna use before starting my mani. Plus, if you're not too used to using your dotting tool, its a nice way to train. I usually use a magazine cover to do my tests, ideally white so my polish color is not too altered:

BeFunky


Then, I apply two coats of my background color to have enough opacity. When it's dry, I put a couple of drops of polish on my magazine cover to create a big color spot. And then, I dip my dotting tool in the drop, and I start dotting! If I make a mistake, I keep a wooden stick or a toothpick close to me to correct whatever is wrong.

BeFunky 

Et voila! Of course if you have longer nail you can make more dotted lines and it will look even prettier!

BeFunky 

BeFunky 

As usual, a picture with the sun light at my window:
BeFunky

Pin It

Monday, April 16, 2012

Splatter Mani

0 comments
After several weeks of growing my nails, I've reluctantly had to cut them. My two thumb nails were torn since a couple of weeks, and my repair attempts with glue polish and fake nails glue couldn't last forever. So I figured I would cut them very short and give them an other chance to grow without breaking this time!

I wanted to do a splatter manicure since a while, and since my nails are too short for a French Mani I figured this would be the right time. Plus, a trashy mani like this makes less noticeable the fact that my thumb nails are all irregular and ugly!

I used Sally Hansen Smooth and Perfect in Fog #01 as my background color. The polishes of this collection are really pretty. They have a kind of "fluffy" or "cloudy" finish that I like a lot. Fog is a subtle grey which looks clean and elegant. the splatters were made with a straw and a toothpick with Sinful Colors Dream on #113 (a neon fushia-purple that I love!!) and Santee Vikini-Green #M60. 
For those of you who would like to purchase Dream on, please note that it is matte, which can be surprising (or at least it was for me at first).

For once I will show you both hands, as each nail is really different.

Here is my left hand:

BeFunky

BeFunky


And my right hand:


BeFunky

BeFunky


I love the variety of effects you can get with this technique, athough the finish I like best is the one I got on my left thumb an index:

BeFunky


Pin It

First Watermarble manicure

1 comments
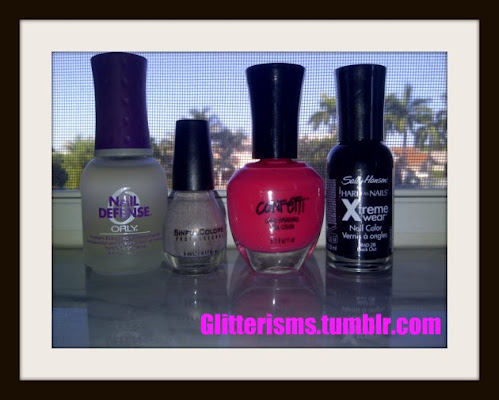
Here are the nail polishes that I used for my very first Water Marble Manicure : 
  • Base and Top Coat : Orly Nail Defense
  • Sinful Colors Twilight #M971
  • Confetti Fruit Smoothie #023
  • Sally Hansen Hard as Nails Xtreme wear Black Out #370
polish
I prepped my nails with one coat of Orly and 2 coats of Twilight. Then, following the instructions posted on various Water Marble Youtube tutorials I started my nail art. Here is the final result!!
It's kind of sloppy... but it's my very first so be gentle ;)


PS : due to some weird bug, this post is not my first Watermarble in the list... please excuse the weirdness :D
Pin It

Friday, March 30, 2012

Neon Pink and Coral French manicure

3 comments
Hi everyone!
This week I wanted to try something a bit different from what I usually do, so I decided to try doing my first home-made french manicure!

For this manicure I used the following colors :

  • Sally Hansen Hard as Nails Xtreme Wear Coral Reef #405
  • Sally Girl Mini  Neon Pink
  • Kiss Nail Art Paint Silver Glitter #SPA10


Here a swacth of Sally Hansen's Coral Reef,  which is a very pretty Coral. I know Corals are really trendy at the moment, and they're a shade that I really like. This one looks like a light pink in the bottle, but once applied to the nails it really seems to change color depending on the light, and gets really pretty orange accents.
I applied two coats.

BeFunky 
BeFunky 


Then I used stickers to build my French Manicure. I chose to make Neon pink tips with a line of silver glitter with a thin brush: 

  BeFunky 
BeFunky 
BeFunky

Here is a picture I took at my pool to show you how Coral Reef can really get orange accents with the sunlight. I love it!

BeFunky

Pin It

Wednesday, March 21, 2012

Crackled

0 comments
Whenever my nails are too short for a nice nail art, I usually go for crackle polish. I find it amazing because it creates a fun effect in no time, and it's super easy to apply.
Plus, it's great for sloppy people like me who mess up their first layer and who want to cover it up, instead of starting over with a new manicure ;-P
Here are some of my latest attempts. For all of them I used the Sally Hansen Crackle Overcoat Fractured Foil #03, and changed the color of the layer underneath.


Here with the Confetti Centerstage #077, a very pretty purple with pink and blue micro-nano glitters. The Crackle was applied in a thick layer, which creates these wide and deep crackles.

BeFunky

BeFunky


Here with Sally Hansen Hard as Nails Xtreme Wear Mint Sorbet #340. I'm normally not a fan of green polishes (and of green in general!!) but I love the frosty, minty effect of this shade, which is emphasized by the silver sparkles of the Crackle.
Yes, one of these fingers isn't mine ;-P

BeFunky


And finally, my latest Crackle, that I removed yesterday! This one was done with Sinful Colors Professional in shade Hazard #952. This Sinful Colors is one of my latest acquisitions, and I absolutely love it! For some reason I've been addicted to Corals and Oranges lately, and this one seems to be a perfect mix of both colors (although I hope to find a Neon Coral polish ASAP ;-)
Here, I applied the Crackle in a very thin layer which allowed me to get thin and numerous crackles.

BeFunky


Pin It